Buildah, Dive, Skopeo: 3 Container Tools for building images on Kubernetes Cluster, with Gitlab CI
Let's talk about building container images.
The most common practice as of now is to have a special server with Docker installed.
On this server, you can run docker commands to build and promote your container images.
Another popular approach is to do the same, but inside the container.
That would mean doing something like a docker in docker, which normally requires you to run privileged containers and mount docker socket into your builder container.
While doable, this approach has certain security implications.
In this article, we will look at a few container image tools.
Each of those tools focuses on a different area of working with images.
Our goal is to build a new image, analyse it's size and, if we are happy with the result, promote it.
We are going to perform all this steps as part of the Continuous Delivery pipeline.
We are going to use Gitlab CI as the engine behind this pipeline and AWS ECR as an image registry.
Under the hood, each build job is executed inside a Kubernetes cluster.
CentOS with enabled SELinux is used for the cluster nodes.
We are not going to use privileged containers or any specific volume and device mounts.
None of the tools we are going to try require this.
Let's start.
This is our Containerfile. Many tools already recognize the Containerfile, so you can slowly rename your Dockerfiles to be less tool specific and more standards focused.
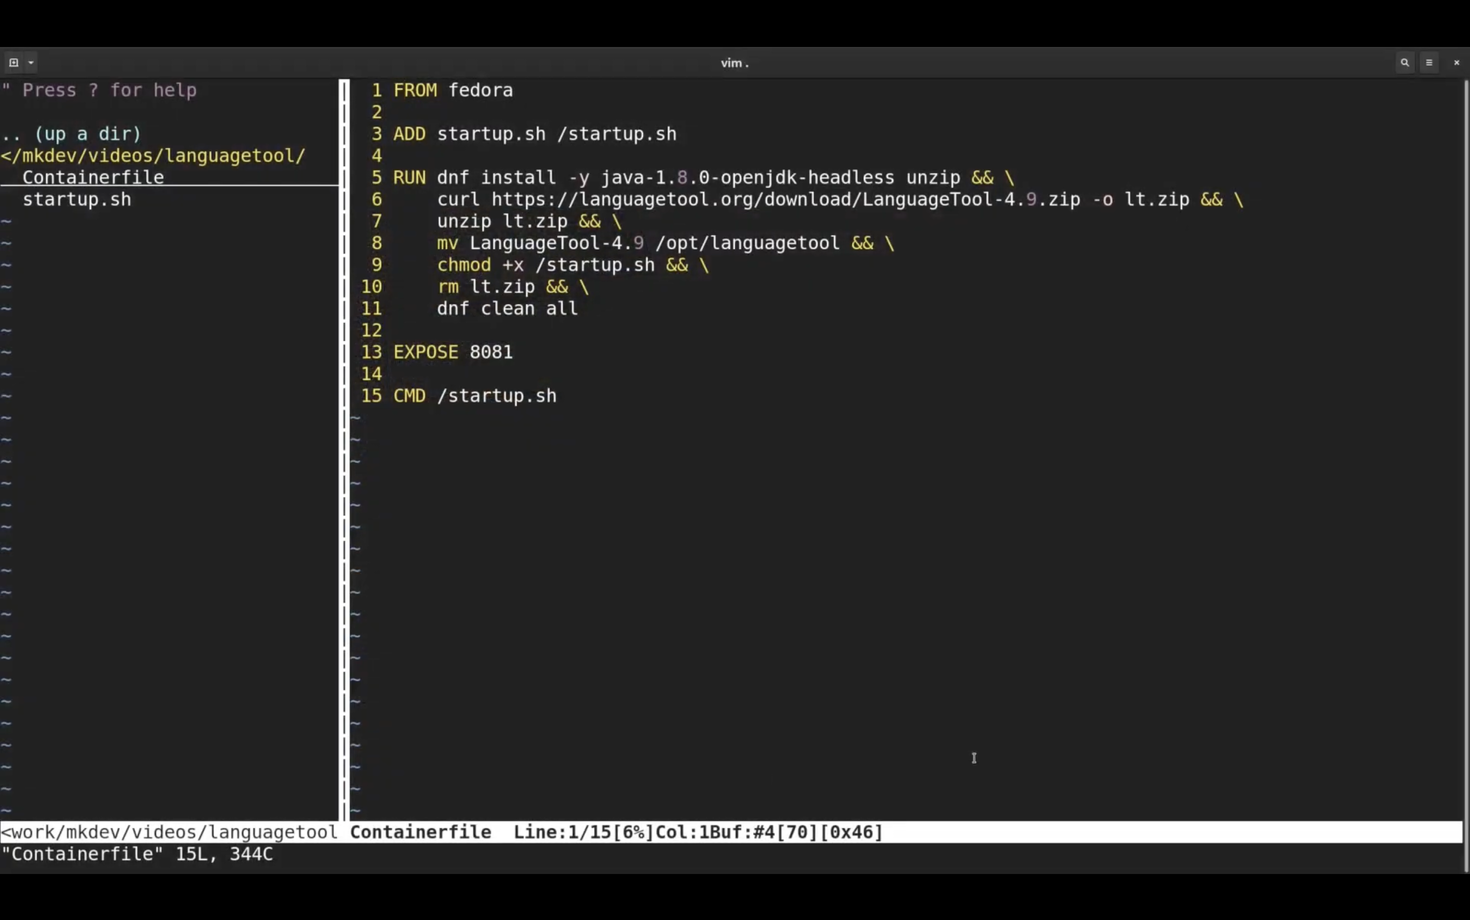
Inside the Containerfile, we are installing a couple of system packages and then downloading the LanguageTool itself.
We also copy the startup script and expose the default LanguageTool port.
To build the image we are going to use Buildah.
The single purpose of Buildah is to build container images, specifically Open Container Initiative standard compliant images.
Images built with Buildah can be run by any OCI-compliant container runtime, including Docker.
What's nice about Buildah is that it's just a single binary. There is no daemon required to build the image and you don't need any special privileges to use it.
You can also use Buildah as a library inside your own container tools, but this use case is outside of the scope of this article.
On your local machine, there is no reason to build images with Buildah. Most likely, you already have a full-featured container manager, like Podman or Docker, that will cover image building needs.
But in the case of Continious Delivery pipeline, a tool like Buildah is really handy.
Let's create a new script called build.sh:
#!/bin/sh
First I will save the image name together with the tag to a new variable
IMAGE_NAME=$REGISTRY/languagetool:$CI_PIPELINE_ID
Then we can execute buildah bud command.
"bud" stands for "build using dockerfile" and is an equivalent to "docker build" command:
buildah bud -t $IMAGE_NAME .
Then we need to login to the ECR - I am using Gitlab CI variables to fetch the registry details:
buildah login -u AWS -p $REGISTRY_PASSWORD $REGISTRY
And finally we can push the image:
buildah push $IMAGE_NAME
As you can see, this is more or less the same process that you would set up with Docker.
After building the image we are going to test it with a tool called "dive".
"dive" analyses each image layer and provides recommendations on how you can further improve it.
It calculates how many bytes you waste on improper usage of image layers and the overhaul efficiency of the size of the image.
One of the nice features of dive is how you can integrate it inside the pipeline.
We can create a file called .dive-ci and set the lowest efficiency rate and the highest number of wasted space we want to tolerate in our build:
rules: lowestEfficiency: 0.90 highestWastedBytes: 20MB
Now let's create a new script called test.
#!/bin/sh
I am going to set the image name once again:
IMAGE_NAME=$REGISTRY/languagetool:$CI_PIPELINE_ID
And then download and unpack the latest dive release:
curl -L https://github.com/wagoodman/dive/releases/download/v0.9.2/dive_0.9.2_linux_amd64.tar.gz -o dive.tar.gz tar -xvf dive.tar.gz
dive supports both docker and podman, but the latest version at the time of this article is not able to pull images with podman automatically.
I am going to login to the registry and pull the image with podman:
podman login -u AWS -p $REGISTRY_PASSWORD $REGISTRY podman pull $IMAGE_NAME
And finally, we can run dive to analyze the image:
./dive podman://$IMAGE_NAME
Let's assume our image test will pass and we can promote it. Promotion would mean that instead of using pipeline id as a tag, we will tag it with "latest".
If we would have a complete Continuous Deployment pipeline, we could deploy this image to a development environment.
To promote the image we are going to use Skopeo.
Skopeo is a tool to inspect and manipulate container images.
It's not able to build images. Instead, it implements half a dozen of different transports for images.
Most important for our purposes, skopeo can copy images from one remote registry to another. We are going to use skopeo copy to promote the image. Let's create a new "promote" script:
#!/bin/sh
Once again, we are setting the image name, this time without fixing the tag:
IMAGE_NAME=$REGISTRY/build-tools
We need to login to the registry:
skopeo login -u AWS -p $REGISTRY_PASSWORD $REGISTRY
And now we can copy the image from one remote location to the other, in this case from pipeline-based tag to the latest one:
skopeo copy docker://$IMAGE_NAME:$CI_PIPELINE_ID docker://$IMAGE_NAME:latest
With Skopeo, we have to specify the transport for the image. The transport in this case is "docker", which means a remote docker registry API.
Skopeo does not require any special permissions and same as buildah, podman and dive, it's just a single binary.
Now we have all the bits and pieces in place and we can configure the pipeline for Gitlab CI.
On the top level, I am specifying the STORAGE\_DRIVER variables to be vfs.
variables: STORAGE_DRIVER: vfs
The first stage is going to be build, where we simply invoke the build script. For the build phase, we are going to use official stable buildah image:
build: image: quay.io/buildah/stable stage: build script: - ./bin/build.sh
test stage is very similar, we just invoke a different script and use the stable podman image:
test: image: quay.io/podman/stable stage: test script: - ./bin/test.sh
promote stage is similar, this time with the promote script and the stable skopeo image:
promote: image: quay.io/skopeo/stable stage: deploy script: - ./bin/deploy.sh
Let me commit all the changes and push it, then we can see what happens.
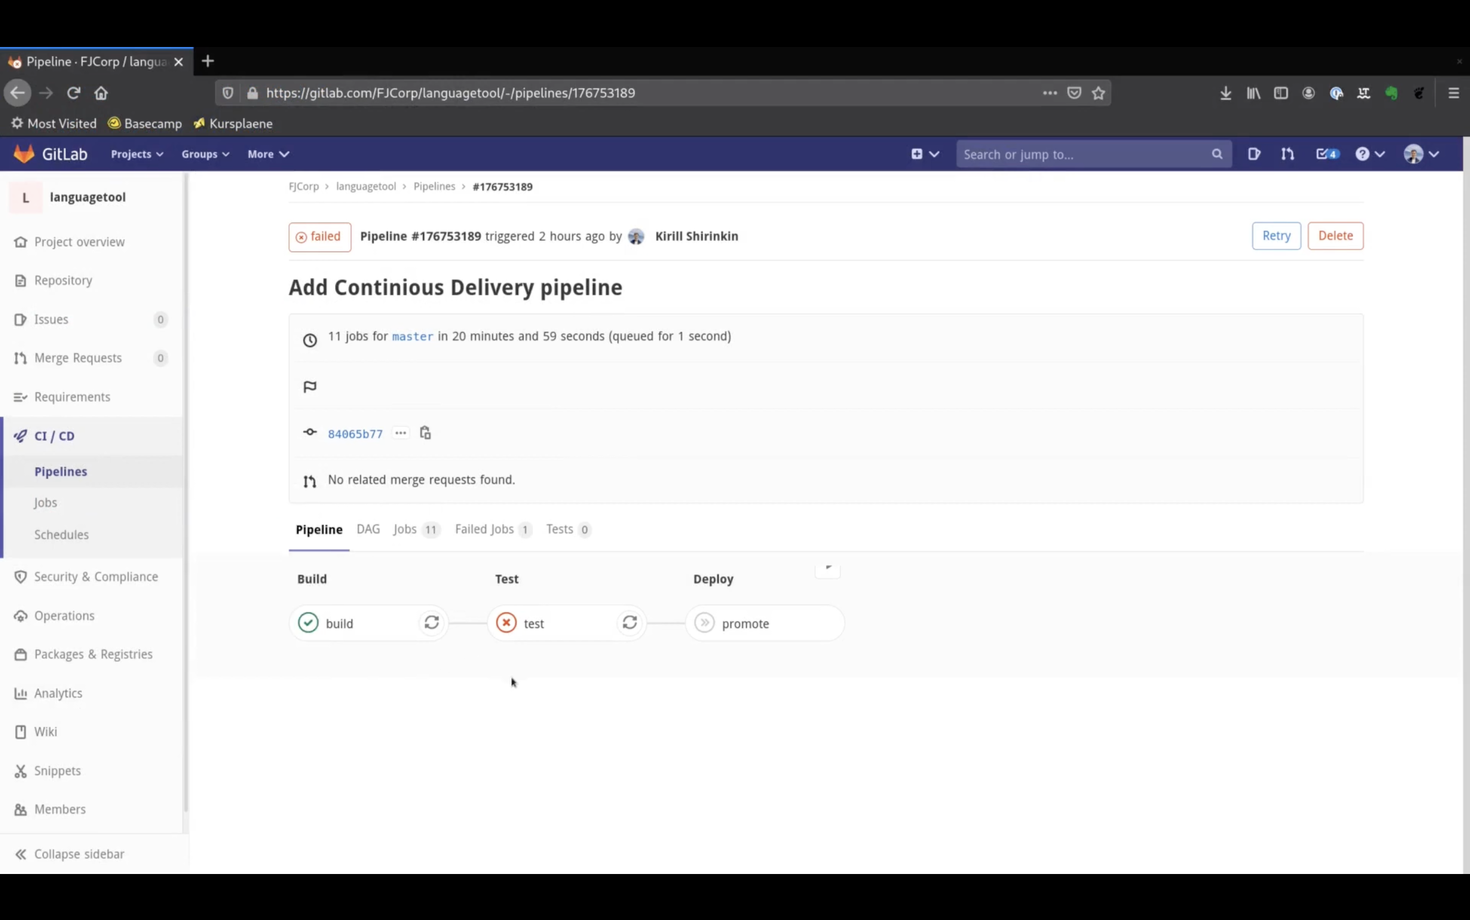
The build stage was successful, buildah created a new image and pushed it to AWS ECR.
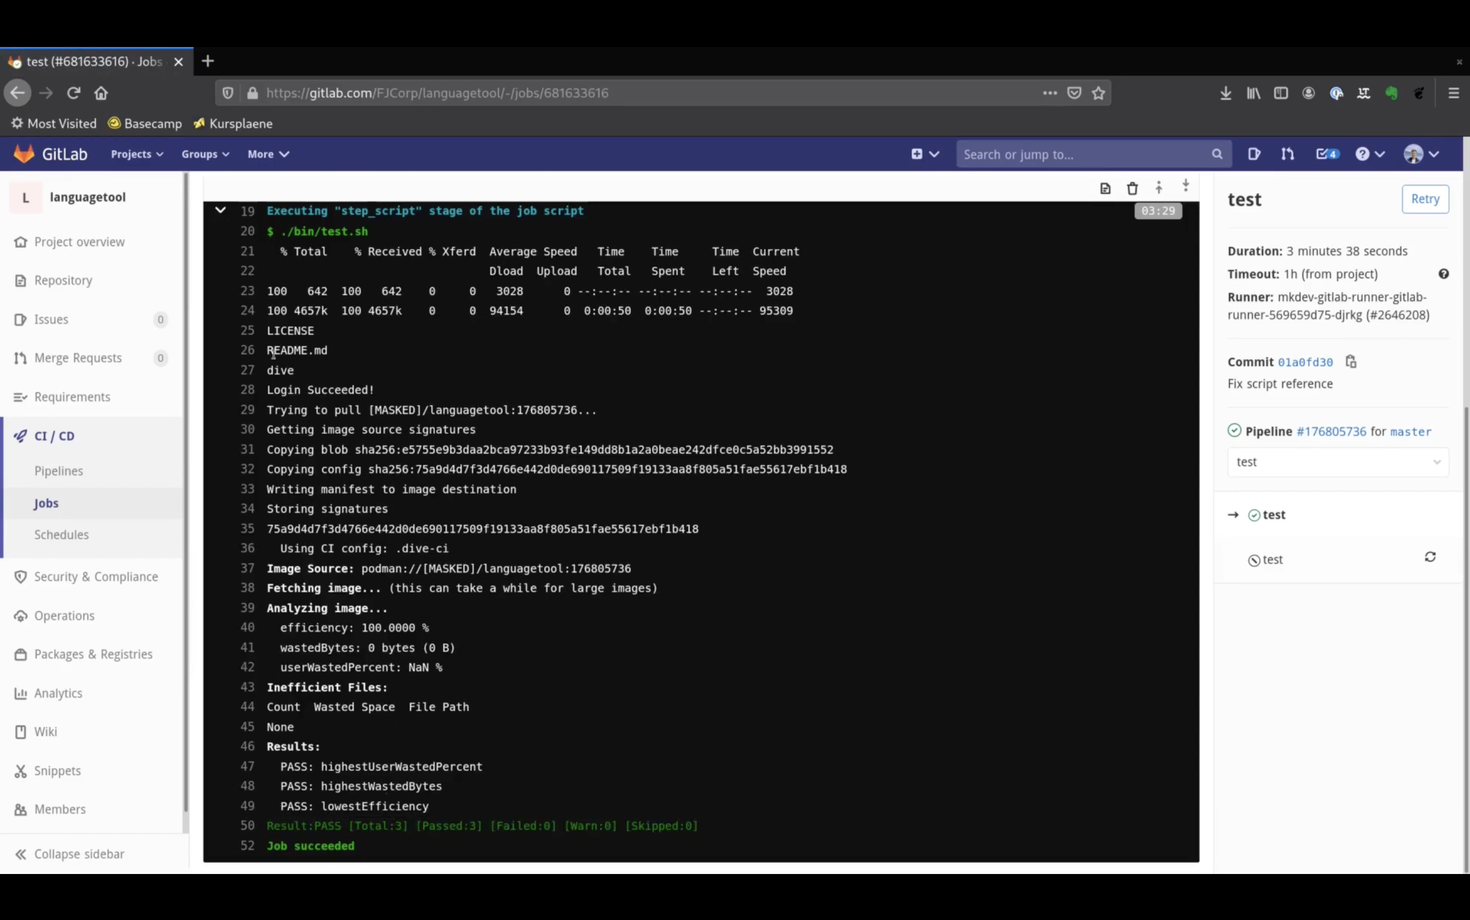
But the test stage failed. Let's see why.
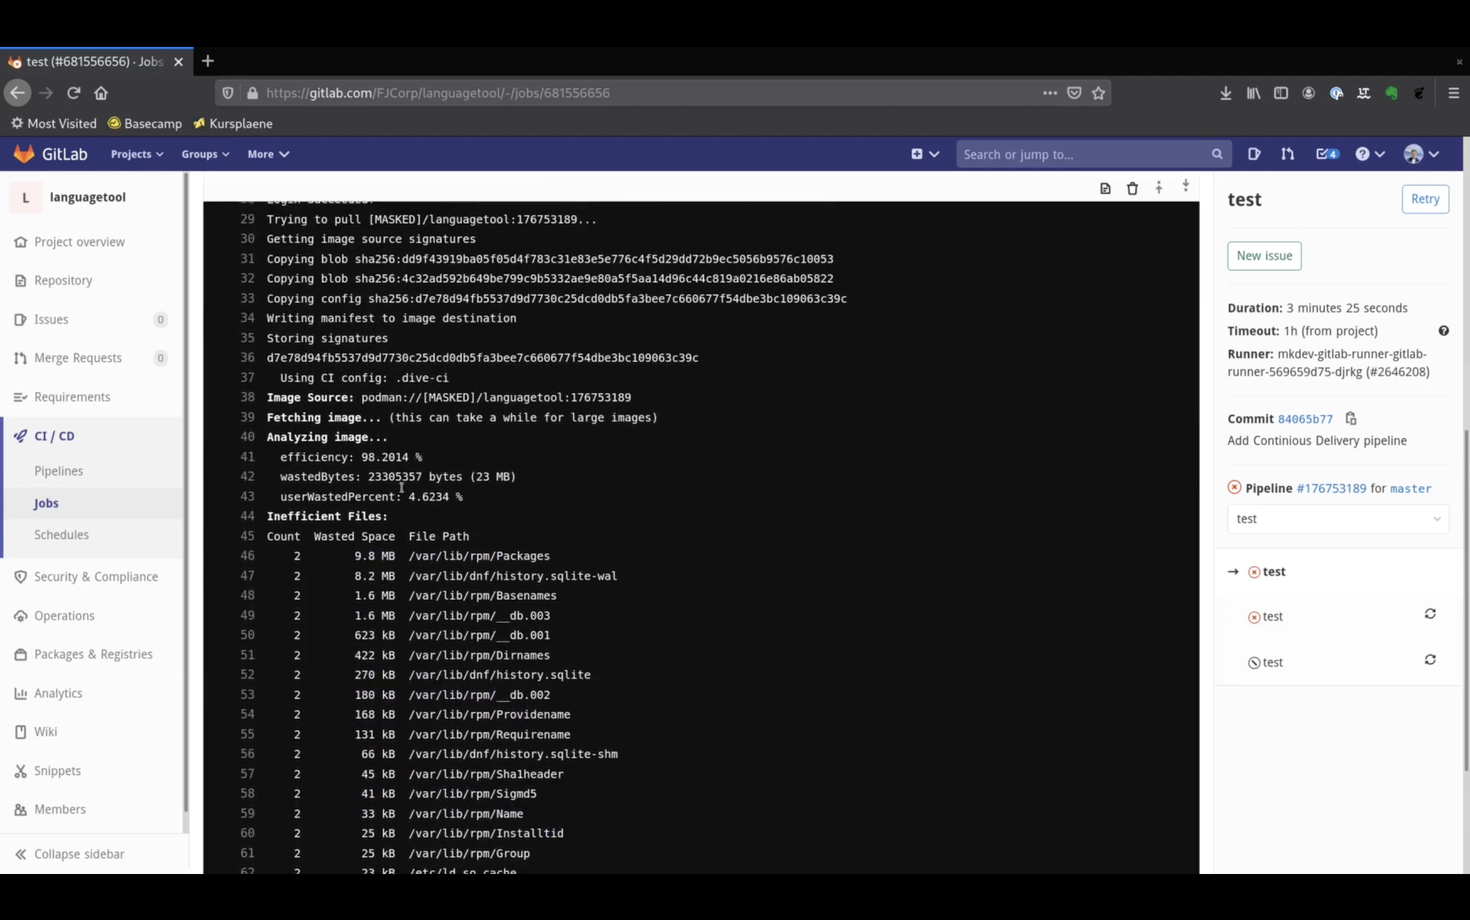
Well, it seems like our image is not as efficient as we hoped.
Let's try something.
Buildah has a squash option. With this option, once image is built, Buildah will squash all the layers into one. Maybe it will improve our image a bit.
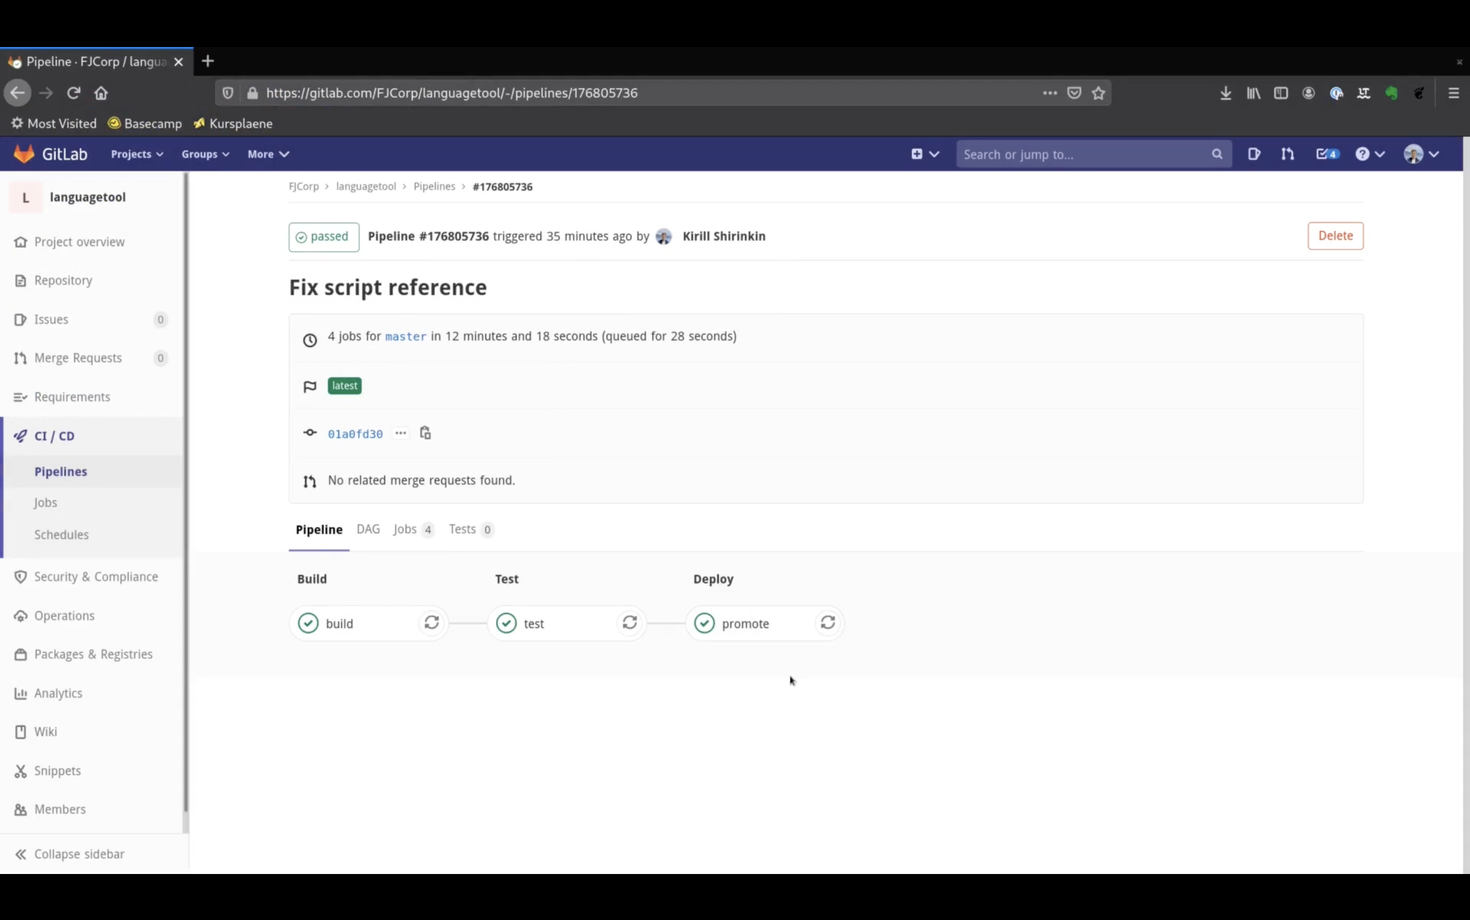
And the pipeline is green!
Note that the commit message here is different, because behind the scenes I had to fix the name of the promotion script inside CI config.
If we check the test stage now, we see 100% efficiency as reported by dive.
And if we check the deploy stage, we see that it literally took seconds for Skopeo to copy the image.
This is because skopeo does not actually pull and push the complete image, but instead smartly works with the built in transports.
To re-cap, we just saw three different container image tools in action, each with it's own purpose.
Such small, single purpose tools are great for automation tasks and for CI/CD pipelines.
You really don't need to drop the whole Docker daemon only to build and promote container images, and in a sensitive environment like Kubernetes you probably should avoid that at all costs.
Few final notes.
The pipeline you just saw could be further optimized to reduce the build time and make use of some image cache. The primary purpose of this pipeline is to demonstrate different container image tools and not to be a reference architecture for building container images.
There are many other tools in container space that I encourage you to try. For example, take a look at Kaniko for building container images.
Here's the same article in video form for your convenience: