Kubernetes Capacity and Resource Management: It's Not What You Think It Is

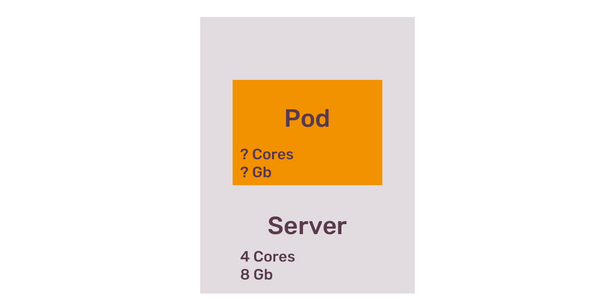
Kubernetes starts with the concept of pods. Pod is a Kubernetes-specific entity and it’s the smallest deployable unit in the cluster. Every workload that you run in the Kubernetes cluster is a pod, thus the instance of your application is no longer a container, but a pod.
The main idea of a pod is to group multiple containers, running on a single server (Kubernetes nodes) and sharing some of the resources with each other, primarily network and identity. In most cases, pod holds only one container inside.
By default, just like in a container, compute resources of a pod are not explicitly constrained. If the application your pod represents needs more and more CPU and RAM over time, it will consume them till it hits the limit of the Kubernetes node where this pod is running.
For a newcomer, such a default behaviour gives an illusion that Kubernetes resource management is especially smart. More often than it should be, people assume that Kubernetes will take care of resource consumption on it’s own. It’s not rare for the first-time users of Kubernetes to expect the cluster to smartly optimise CPU and RAM for every pod, to ensure least possible distraction, and give every workload according to it’s needs.
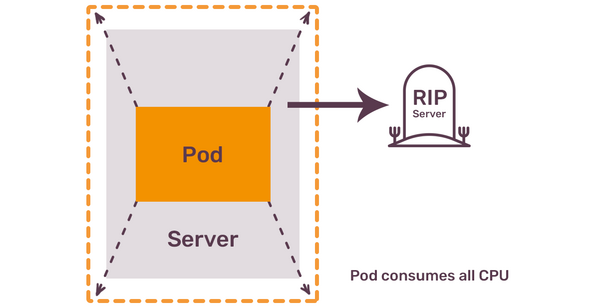
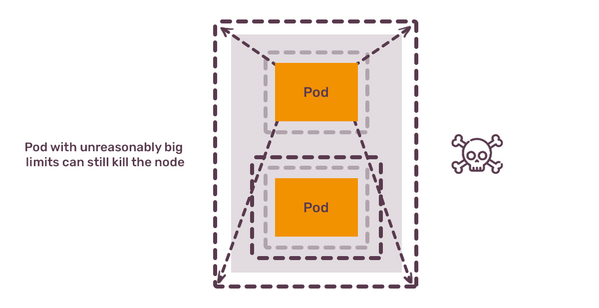
The brutal reality is that a pod that relies on the default configuration - or, more precisely, lack thereof - might not only try to consume all of the resources of the Kubernetes node, but it will also, as a result, disrupt any other pods on the same node and eventually make the node itself unresponsive. Once Kubernetes node is stuck due to maxed out CPU or running out of RAM, the only option for the cluster operator is to restart this node. Restarting a node, of course, doesn’t come for free. Each pod needs to be re-scheduled while restart is happening, and existing healthy nodes need to have enough capacity to fit those pods.
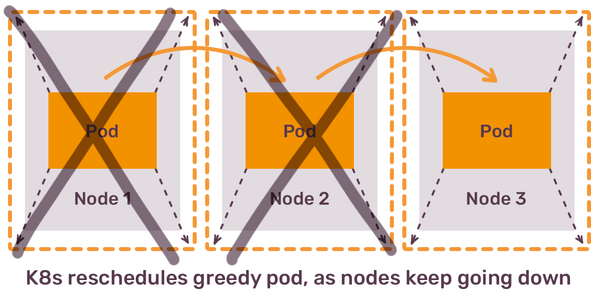
How will Kubernetes ensure that healthy nodes have the capacity to fit evacuated pods? It won’t. As pod’s resources are not explicitly constrained, Kubernetes scheduler will happily put the same hungry pod on any other node in the cluster. The story repeats: resource consumption of this pod will start growing over time till, once again, it disrupts another node. In a sequence of re-schedules of the same pod, you end up with more and more nodes either in an unresponsive or in a restarting phase. In the most severe case, this can lead to a complete cluster degradation and a major downtime for all the applications you trusted Kubernetes to run.
The lesson from this is that Kubernetes scheduler does not take into account how many compute resources your pods need, unless you tell Kubernetes about it. The way to do it is to configure “resources” for each of your containers, and this is the first thing you have to do for all of your applications.
Container resources
Limits and requests
Resources configuration consists of two parts: requests and limits. Here is a simple example directly from the Kubernetes documentation:
    resources:
      requests:
        memory: "64Mi"
        cpu: "250m"
      limits:
        memory: "128Mi"
        cpu: "500m"
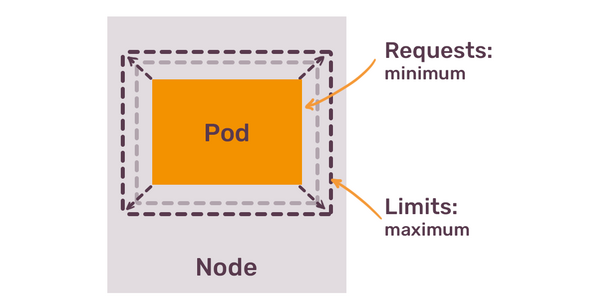
The difference between requests and limits is simple:
- You request resources that your container absolutely needs.
- You limit consumption of resources to the maximum that container might ever need.
In the example above, we know that container needs at least 64 mebibytes of memory and 250 CPU millicores.
Most of the time Kubernetes makes you think about “pod” as the smallest unit in the cluster, but when it comes to resource consumption you are back to thinking about individual containers within the pod. Resources of a pod are the sum of resources of all its containers.
Two different settings for container resources allow accommodating for bursty workloads. You might have an application that most of the time uses 1 CPU core, but every now and then spikes to 2 CPU cores. You also might have an application that consumes lots of RAM during the startup time, but otherwise mostly stays at a lower level.
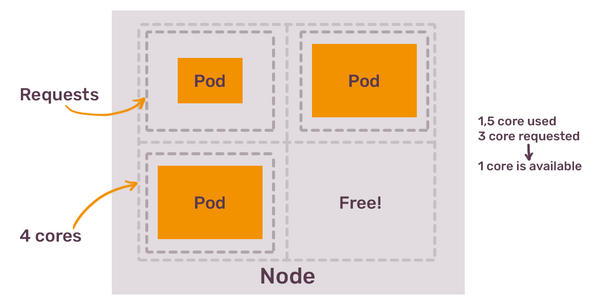
Those two options differ dramatically in the impact they have on your containers. Resource limits are a hard boundary for your workload. When container reaches CPU limit, it gets throttled. When it hits the memory limit, it gets killed with OOM error.
Resource requests are different. They are used by Kubernetes to guarantee your application a certain amount of resources. If you tell Kubernetes that your container requests 2Gb of RAM, the scheduler will find a node that has 2Gb of RAM available. Once the pod is scheduled on such node, those 2Gb of RAM will be reserved for the container that requested them - even if the pod never consumes this amount of memory.
At a first glance, this might seem like a simple, easy to configure system. Once your containers have resources set, your Kubernetes capacity management quest is over. But the devil, as always, is in details.
Time bombs and Quality of Service
What happens if most of your containers have properly configured requests and limits, but some still don't? To understand this, we need to talk about the concept of Quality of Service (QoS) classes in Kubernetes.
There are 3 of them:
- BestEffort
- Burstable
- Guaranteed
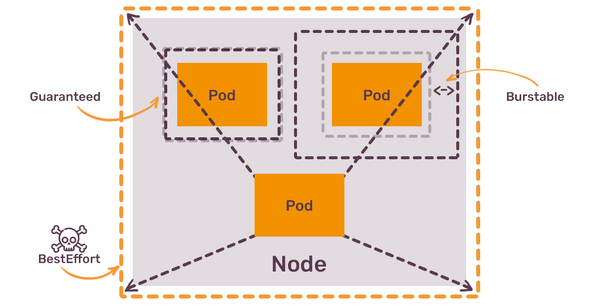
Each pod has one of those QoS class assigned. You can not assign this class directly. Instead, Kubernetes does it for you, based on the following principle:
- Pods without any
resourcesset get BestEffort class - Pods with
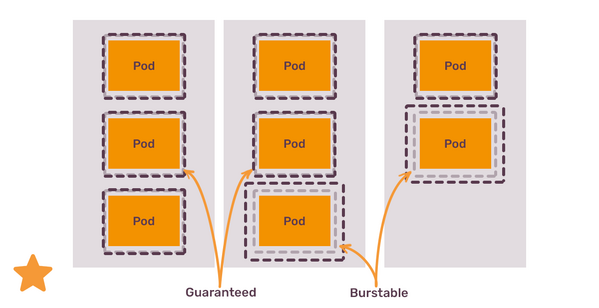
limitshigher thanrequestsget Burstable class - Pods with
limitsequal torequestsget Guaranteed class
In theory, Kubernetes scheduler will always give priority to pods with Guaranteed class, followed by Burstable, and only then by BestEffort. If a single node has a mix of pods with all 3 classes, the ones with BestEffort class should get terminated if it tries to consume too many resources. How will Kubernetes understand that it this pod uses too many resources if no resources were set in the first place? It won’t. But it will try. This is why it’s called “Best Effort”.
As long as you have pods without any resources set, you have a time bomb on your nodes. Kubernetes scheduler will happily place such pods on any node that has any spare space, and those pods will, potentially, attempt to “kill” everything at sight by suddenly increased CPU or RAM consumption.
This is the first lesson of Kubernetes capacity management: you have to set requests and limits for every single container in your cluster. This includes not only your applications, but any third party software that you run. Your
Ingress Controller containers need resource requests set, as well as the Cert Manager, CI/CD tools, monitoring integrations and anything else that your cluster might be running.
The easiest way to do this is to configure LimitRanges for each namespaces in the cluster - this way, each pod will get default values for requests, that can be later on overwritten by each workload when needed. You need to explain this behaviour to the cluster users, as they might be surprised that their applications get very limited resources by default.
Then, Burstable or Guaranteed?
When you set the resources, you have a choice between setting limits to be equal to requests, and setting limits a bit higher.
If you want to set them equal, and thus get a Guaranteed QoS class, you can either increase requests or lower the limits. If you increase requests, you might be blocking too many resources for nothing. If you lower the limits, your application might not have enough CPU or RAM to perform at peak times. The choice between “wasting a bit of resources” and “risking application performance” is not Kubernetes-specific, same kind of metal exercise would be needed with virtual machines and bare metal servers alike.
This choice seemingly disappears if you opt in for the Burstable class - in this case, the amount of resources you “block” on the node is lower than the amount of resources container needs at the peak. In this case, you need to remember two things:
If Burstable pods and Guaranteed pods are running on the same node, Guaranteed pods will be preferred in case of node resources exhaustion;
Limits are not considered by Kubernetes Scheduler when placing the nodes, meaning that the node might not have enough resources to satisfy this limit in any case (more on that a bit later);
As a rule of thumb, prefer Guaranteed class for the most important workloads (for example, applications that serve live traffic or StatefulSets), and Burstable for everything else.
Having resource requests configured for each container is the only way for the cluster scheduler to function decently. It’s also the only way for the HorizontalPodAutoscaler (HPA) to be able to scale your deployments horizontally, without introducing external metrics integration. And it’s also the only way for the cluster autoscaler to do its job - we will talk about it when we get to the node resource management part.
How much is the pod?
When you try to configure resource requests for your applications, you wonder what the values should be. How much CPU and RAM your application needs? The answer is easier if you have metrics of this application running elsewhere. If you don’t, then you either need to perform some performance and load testing, or set some values you feel will fit, and adjust over time.
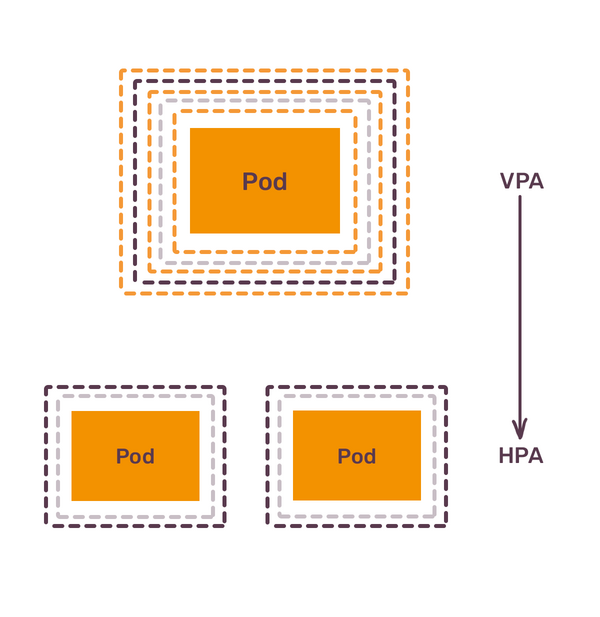
When adjusting container resources, keep in mind, that Kubernetes favours more pods, not bigger pods - thus, trying to scale your container resources only vertically won’t be viable over the long term.
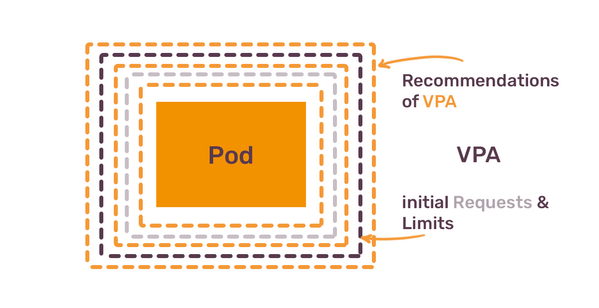
One way Kubernetes allows to automate this process is via VerticalPodAutoscalers (VPA). VPAs, in its default mode, provide you with recommendations on how to set your resources. Those recommendations are based on historical usage, as found in the metrics server. You should configure VPA to use Prometheus as the metrics storage — otherwise VPA relies only on real-time metrics.
Thus, the next lesson is: configure VerticalPodAutoscalers to understand the resource needs of your containers.
The curious feature of VPA is that you can not use it together with HPA.
Let’s say you start with 1 Pod of your application Deployment and you want to understand its resource usage. Once you create VPA, it will start making checkpoints of CPU/RAM usage, and provide recommendations based on this data. You send some portion of production traffic to — or perform load test on — this Deployment, and then wait.
After 1 day, you will get recommendations based on 1 day usage. After 2 days, recommendations will be based on 2 days of data. As days go by, recommendations will slightly change. It will go up to 8 days by default, and on day 8 you will have VPA recommendation based on 8 days history. After 8 days, recommendations will be based only on last 8 days, which should probably be enough to understand resource consumption for most applications.
If you configure VPA to get historical metrics from Prometheus, then you don’t have to wait for another 8 days to get recommendations based on long enough period of time, VPA will get the data from Prometheus.
Let’s say that after 8 days VPA tells you to set requests to 1 CPU and 2G of RAM. You do exactly that, and then you realize that running only 1 pod for your application is wrong — you application is not Highly Available. It might be okay for a background jobs processor to be down for a minute while Kubernetes creates a new pod, but it’s definitely not okay for any application that constantly serves some traffic. You need to run at least 2 pods, so that if 1 pod is gone, there is one more to handle requests.
Once you change your Deployment to run 2 pods instead of 1, resource consumption changes dramatically. VPA will see that each pod needs less CPU and RAM, and at some point will recommend you to tune requests down to 0.5 CPU and 1G of RAM. Once you apply these new recommendations, you should have a good resource configuration of your pods, and you can think about adding HorizontalPodAutoscaler.
HPA works different from VPA. HPA will check utilization of pod resources compared to what pod requested, and if utilization reaches certain threshold, it will add more pods. If utilization falls below another threshold, HPA will reduce number of pods. There is a good reason VPA and HPA can’t be used together — VPA stops making sense if resource consumption of pods is not constant. Once you get a baseline from VPA, you can get rid of VPA and use HPA for a given application.
To summarize, next lesson is, when you bring new application to Kubernetes:
- Set initial resources based on the best of your knowledge.
- Use VerticalPodAutoscaler to understand baseline resource usage.
- Switch to HorizontalPodAutoscaler to adjust amount of pods to production load.
I am oversimplifying here a lot, of course. The focus of this article is primarily on CPU and RAM, but you can configure HPA to scale your pods based on any custom metrics. There are also projects like KEDA that introduce even-driven auto-scaling for the pods.
This process is not different from what you would do with regular virtual machines / instances on any modern cloud provider. Replace “use VerticalPodAutoscaler” with “observe CloudWatch metrics”, and “use HorizontalPodAutoscaler” with “use AutoScaling Groups”, and you will notice that running pods in Kubernetes is not that different from running applications on EC2 instances - in terms of resource management in any case.
There is only one big difference: when you manage and scale resources for cloud provider’s virtual machines, you never think about how underlying cloud provider’s bare-metal infrastructure scales to accommodate your virtual machines. But when you manage resources and scaling of your Kubernetes pods, you also have to constantly think about Kubernetes nodes that run your pods.
Kubernetes audit: it's a complex framework, and it's tricky to get it right. We are here to help you with that. About Kubernetes audits
Node resources
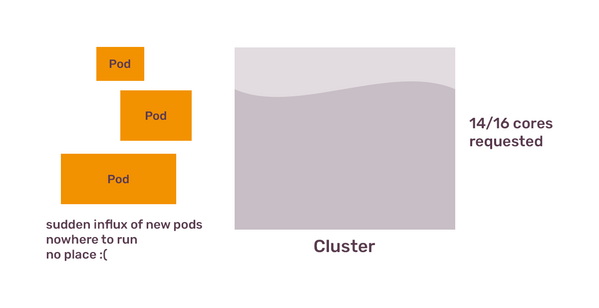
If you use the Kubernetes cluster provided by someone else, you might not think about the underlying cluster nodes — you just deploy your pods and call it a day. Pretty soon the cluster operator will come to you and ask to set resources for your deployments. You will follow the 3 step process outlined above to determine the amount of CPU and RAM your application needs. You learn that it needs 2 CPU cores and 4Gb of RAM. You set those values in your Deployment spec and wait for new pods to appear. They don’t.
“Why?” — you ask your Kubernetes cluster operators. The answer won’t please you: cluster is full, there is not a single node that has 4Gb of RAM available for scheduling.
Scaling cluster resources manually
Kubernetes cluster consists of control plane nodes and worker nodes. Worker nodes run all the pods, unless you make a mistake of letting control plane also run regular workloads (don’t do that). The capacity of your cluster is defined by the sum of compute resources of all the worker nodes in the cluster - you can’t run more pods than your nodes can fit. If you need to run more pods, you need more nodes. Thus the quick fix is obvious: you need to scale out the cluster by adding more nodes.
Problems with the fix are:
- You need to remove nodes manually once the load goes down (at night, for example);
- You need to constantly add more nodes as the load growth together with the number of users;
Scaling cluster resources automatically
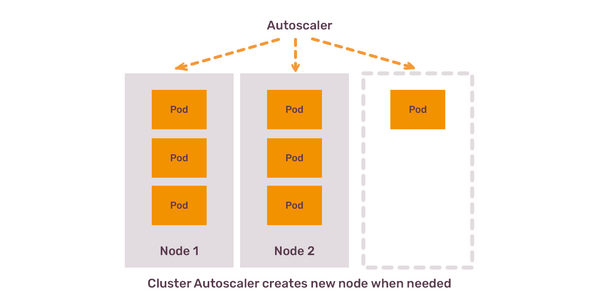
The proper fix requires a bit more effort: Kubernetes cluster, whenever possible, needs to have a Cluster Autoscaler up and running. Regardless of the cloud provider, the idea of a Cluster Autoscaler is the same: when you almost exhaust the capacity of your existing worker nodes, Autoscaler adds more nodes. If you have too many mostly idling nodes, Autoscaler removes nodes.
This is similar to autoscaling without Kubernetes. Indeed, most of the cloud providers implement Cluster Autoscaler support by leveraging existing native auto-scaling capabilities of that provider. If you are using Cluster Autoscaler on AWS, it will use AutoScalingGroups to do the scaling. There is one important difference between regular autoscaling and autoscaling of a Kubernetes cluster: metrics that are used to decide if scaling event should be triggered.
If you run your application directly on compute instance, you would normally trigger auto-scaling based on compute resource consumption. If average CPU utilisation of all the instances of your application is more than 80%, then add more instances to get it below 80%. If utilisation is lower than 50%, remove some instances. You can’t do that with Kubernetes for two reasons.
Kubernetes nodes reserve what your pods request
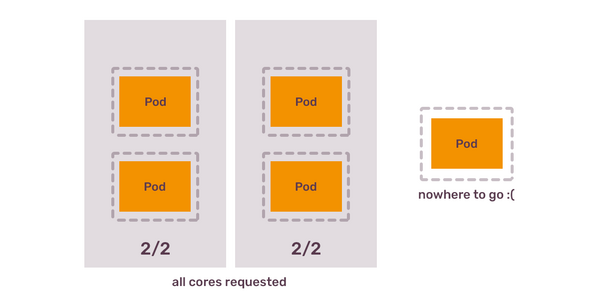
When your pod requests 1 CPU core, Kubernetes won’t search for the node that has idling CPU core. Instead, it will search for the node that has unallocated CPU core. This is because resource requests are the minimum that your pod needs to function.
Kubernetes Scheduler’s job is to make sure that the node where it places this pod is able to provide this minimum. If your node has 4 CPU cores and you put there 4 pods each requesting 1 CPU core, then this node is not any longer available for any new pods, even if those 4 scheduled pods do nothing at all. Kubernetes allocated 4 CPU cores to pods.
You can’t utilise 100% of the node resources
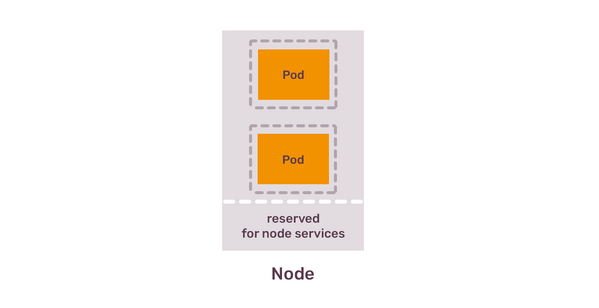
The example above is not completely correct, because in reality you can’t request 4 CPU cores from the node that has 4 CPU cores, because that node also runs processes required by the Kubernetes itself - different components that make this server a Kubernetes node.
You can see how many resources are allocated for pods by running
kubectl get nodes/$node -o yamlcommand.
You can not disrupt those components, because that would be disrupting complete node with all applications on it - this is why be default Kubernetes always reserves some compute resources for those critical components.
You also can’t let utilisation of the whole node to spike to the maximum because of the single pod, because that would mean that other applications won’t get enough resources when they need it (or their performance will degrade due to this noisy neighbour).
This means that you almost never fully utilise Kubernetes node. You should try to maximise utilisation, just not to waste too much money on unconsumed resources, but getting it “just right” will require a lot of effort.
You don’t utilise 100% of pod resources
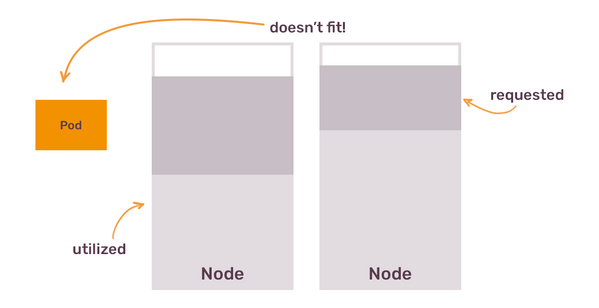
Imagine you have 3 Kubernetes nodes with 2 CPU and 4Gb of RAM. Imagine you have a Deployment with pods that need 1 CPU core and 2Gb of RAM, and you start with running 3 pods. None of the nodes can fit 2 pods of your application, simply because some of the CPU and RAM is reserved for the system components. You end up with each of the nodes running 1 pod of your application.
You then configure HPA for this Deployment to add more pods if RAM utilisation of existing ones reaches 80%. You have 1 node with 4Gb of RAM, that allocates 2 Gb of RAM to a single pod. When this pod uses 80% of RAM, it uses 1.6Gb of RAM. Your node RAM usage is only at 40%, definitely not enough to justify creating another node. But your Deployment’s HPA demands scheduling another pod, which needs 2Gb of RAM. Existing nodes don’t have 2Gb of RAM, because they already reserved 2Gb of RAM for existing pods, and another 500Mb for system components - remember, that Kubernetes Scheduler only cares about resource requests, not actual usage.
The only way out? Create another node, and then another one, as long as this particular Deployment keeps scaling out and demand more pods. The result: you have a lot of heavily underutilised Kubernetes nodes, as long as you don’t run other applications which request less CPU or RAM and thus can be placed on those nodes.
You can’t fully predict what your cluster will run
You don't bring Kubernetes to your company to run 1 application, that would be an overkill. You bring it to provide a generic way to run many applications, and those applications have different resource requirements. One application might be a traditional web service, which scales horizontally via HorizontalPodAutoscaler and mostly needs CPU. Another application could be a background job processing, that is heavier on RAM.
Each group of pods has different resources and different patterns of using these resources. Even if you figured out how to organise your nodes according to existing applications, new applications that developers want to run on the cluster might surprise you. For example, new application might be a CronJob that runs 6 times per day and needs more CPU and RAM than any other pod and that doesn't fit on existing nodes.
For all these reasons, scaling out Kubernetes cluster is based not on the resource usage, but on the resource requests. If your existing nodes can satisfy 50 CPU cores requests, and you need 55 CPU cores, autoscaler will create more nodes till it can fit all the pods. This is the job of the Cluster Autoscaler: to calculate what your pods request, what your nodes offer and trigger scaling event based on this calculation. It also takes into account resource utilisation, but only to reduce the number of nodes, and only if remaining nodes can satisfy all the resource requests.
Once you learn this, the solution seems almost trivial: deploy Cluster Autoscaler and let it scale the number of nodes in the cluster. That, of course, till we hit the next obstacle.
Most often, you will have a homogeneous cluster nodes. You decide up front that you will run nodes with 4 CPU cores and 8Gb of RAM and let Cluster Autoscaler add more nodes when needed. And then one day someone needs to run a pod that requests 10Gb of RAM. No matter how much you scale out your nodes, they won’t fit this pod.
What do you do in this case?
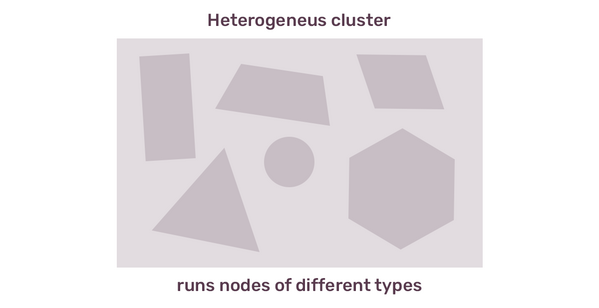
Heterogeneous cluster
You can mix multiple types of nodes in a single cluster. Kubernetes itself does not care if you have 5 nodes with 4 CPU / 8 GB RAM and 3 nodes with 8 CPU and 16 GB RAM. You can even configure Cluster Autoscaler to scale those group of nodes independently. But should you do that? Or will it make more sense to just run bigger nodes and keep cluster homogeneous?
It might make sense to do the latter, as long as your pods don’t have more complex requirements, like, for example, GPU. You can’t run every node in the cluster with GPU, that would be a waste if most of your pods never need this.
If you mix different types of nodes in a single cluster, you will have to learn about pod’s node selectors, affinity and antiAffinity rules, taints and tolerations - to properly configure which pods should run on which nodes. Kubernetes Scheduler got you covered - all the bits and pieces for fine-grained pod placement are there, you only need to learn how to use it.
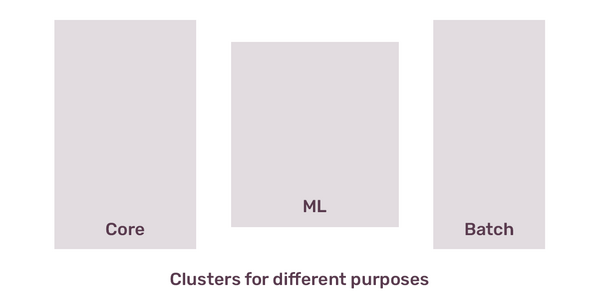
Multi-cluster
Alternatively, you can create another Kubernetes cluster, with nodes configured to fit different kinds of workloads. You could have one cluster to serve horizontally-scaleable realtime applications, and another one for Machine Learning, and a third one for internal tools, like CI/CD jobs - not an uncommon setup.
Running more clusters instead of bigger clusters is the direction where Kubernetes and tooling around it are moving. From capacity management, it makes a lot of sense - you probably don't want your batch jobs to have a big influence of scheduling and performance of web applications, so you’d better isolate them.
Advanced Cluster Auto-scaling
There are tools that you can deploy on your cluster to simplify this process a bit. One of them, Karpenter, aims to automate provisioning the right nodes depending on your pod needs. This way, you just trust Karpeneter to create a node that can fit a pod requesting 10Gb of RAM if such node appears in the cluster. It’s similar to how Google Cloud GKE Autopilot is working, to which we will come back at the end of the article.
Multi-tenant clusters
If you think we are getting closer to the end, I have to disappoint you. There are still some more things you have to keep in mind.
Let’s say you have all your pods with resources configured. You have a cluster that scales out automatically based on those requests. It seems like you can now finally forget about all of this boring capacity management and just enjoy cloud-native elastic containerised environment. But then you learn, that resource limits are not considered by scheduler.
To remind, resource requests are the minimum your pod needs, and this is the amount the node will reserve for your pods. Resource limits are the maximum your pod can consume. When it reaches the RAM limit, Kubernetes will kill this pod. When it reaches the CPU limit, pod will be throttled.
What happens, if you request 2Gb of RAM, limit it to 10Gb of RAM and place it on a node with 6Gb of RAM? Your pod kills this node - or, at least, other pods on this node. What happens if you do the same with CPU? Your node becomes unresponsive due to maxed out CPU usage. Requests give you control. Misconfigured limits take it away from you.
How do you fix this? You don’t. At this moment, you lost the Kubernetes capacity management game. The race between cluster operators configuring the nodes and cluster users bringing more and more apps on the cluster is lost by the cluster operators. It’s time to give up on Kubernetes.

This, or you enforce quotas on the resource usage.
Resource quotas
All of the problems with cluster nodes resource management come from the fact that Kubernetes cluster is used to run multiple apps from multiple teams. Developers don’t want to care too much about configuring resources for their containers and they might even have an illusion that Kubernetes cluster solves all of the resource management problems out of the box.
As we know by this point, not only Kubernetes doesn’t solve them, it even makes them more complex to solve. Cluster operators can’t run after every developer and ask nicely to properly configure requests and limits. But they also can’t let developers disrupt the whole cluster, or to scale the cluster out to unreasonable size by misconfigured HorizontalPodAutoscaler. The solution to this problem is to configure Resource Quotas.
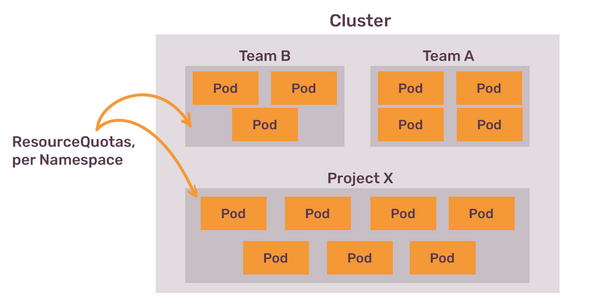
Kubernetes Resource Quotas allow to set different kinds of boundaries for the complete namespace. You can use them to say: “Namespace X can request maximum of 20 CPU cores and 40Gb of RAM. It can limit to the maximum of 30 CPU cores and 60 Gb of RAM”.
You can set quotas for many things, not just for CPU and RAM: for example, you can set how many persistent volumes of certain type can be created, and even how many GPUs can be used by the pods in this namespace.
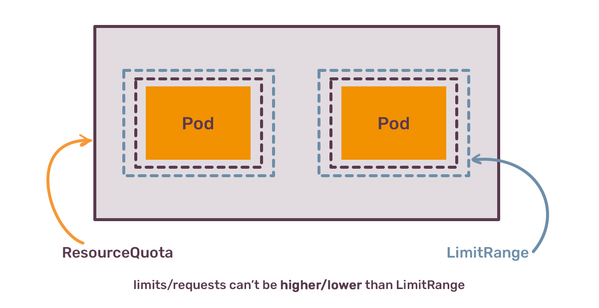
Quotas help to restrain the total amount of resources consumed by a single namespace, but they don't set any boundaries for a single pod. To do this, there is yet another object that was already mentioned before, called LimitRange.
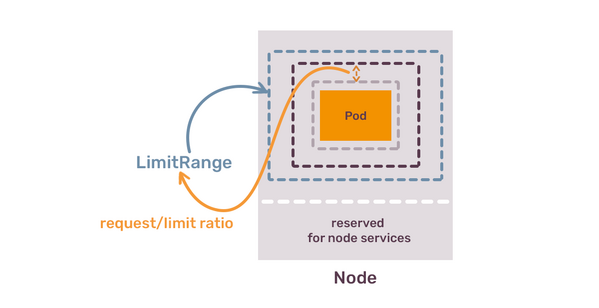
LimitRange allows you to configure the maximum and minimum resources that can be used by a single pod in the particular namespace. Once you add a LimitRage, pods in this namespace must have resources configured (which already enforces one of the first things you should enforce). You can also configure default requests and limits inside the LimitRange. It makes sense to set the maximum to be a bit less than the size of a single node in the cluster (unless you have a heterogeneous cluster nodes, or even use Karpeneter or GKE Autopilot to provision nodes based on their resources configuration).
Even more important configuration option of LimitSpec is enforcing a ratio between requests and limits. With this one you can avoid someone requesting 1 Gb of RAM and limit it to 32 Gb of RAM. Instead, cluster operators can say: “ratio must be a maximum of 1.5”, then cluster users can only set the limit to 1.5Gb of RAM, if request is 1Gb.
To summarise this section, the next lesson, or the thing you have to do with your cluster is:
- Set Resource Quotas for each namespace;
- Set LimitRanges for each namespace;
- Enforce rations between requests and limits in a way that will lead to least chance of disruption in the cluster;
Once you have this in place, you won the Kubernetes Capacity Management Game.
This article continues after Part I and concludes in Part III!
Article Series "Kubernetes Capacity Management"
- Evolution of Capacity Management: From Bare Metal to Kubernetes
- Kubernetes Capacity and Resource Management: It's Not What You Think It Is
- Kubernetes Is Not an Orchestrator: The Jump to Universality for Infrastructure Abstractions